This is my first motorcycle. I like the look of the 60-70's Hondas
and when I saw this green 200, I bought it. It had 6,000 miles, ran a
little rough, and had low compression. The carbs needed lots of work.
Clutch cable needed replaced . It also had absolutely no power in 5th
gear. It was tough to hold 55mph. So I decided to tear into it, learn
how it all works and hopeful make it run better. I hope someone may find
this helpful. I found sites similar to this helpful when I was going
through it all. If anyone is diving into this
themselves, feel free to email me or comment and I'll try to help you
out.
Thursday, July 18, 2013
Carburetors
Unfortunately I don't really have any pictures to show this process. I first took apart the carbs and cleaned the jets with carb cleaner. Then I sync-ed them manually. I took off the air filters(or box) and then having my brother slowly open the throttle, I held my fingers on the slides as they raised up. Do this as they open and then as they close. My one carb needed a small adjustment by turning the nut on the top of the carb where the gas comes in. It takes a while to dial it in, but getting the settings on the air mix and fuel screws are very important. Lots of trial and error. My advice is to start from the factory settings and then slowly adjust either way until it's a strong idle. I ended up at (roughly)1 1/2 air screw and 3 1/4 on the fuel screw.
The bike was dying randomly for me and sometimes it would dump gas out of one of the bowl overflow hoses. This was from 2 things.
1. I determined that the float had a tiny hole in it allowing it to fill with gas and never float up enough to shut off the gas coming into the bowl. I tried many remedies, jb weld, soldering, silicon, etc. Nothing worked long term. I broke down and bought a new one on ebay from Thailand. Works great now.
2. The previous owner had put aftermarket cone air filters instead of the stock airbox. Surprisingly they were choking the carbs and it wasn't getting enough air. I determined this by inspecting the spark plugs and trying the bike with the air filters off. I put on some uni foam filters and they work perfect.
Then of course, I had to reset the air and fuel screws again.
I also experimented with different needle settings. Moving the needle up would nearly kill the bike at first, but then have strong acceleration. Lowering the needle seemed to be bad all around. So, the middle setting ended up being the best for my bike. The carbs take some patience, but it was very rewarding to work it all out on my own. Just don't go to far before you have them dialed in. I've pushed the bike back to the garage many times.
Reassembly
I coated the new rings, new pistons, new pins, cam, rockers, everything in Lucas Assembly Oil.(pic3) I followed the break-in procedure that pgcb200 posted on HondaTwins.com. So far so good. I've got about 225 miles on it now and it runs nice and strong. I used a a stroboscopic timing gun and a circuit test (with the light) to check the timing. When the timing is right on, the bike ran OK, but was noticeably weeker and wouldnt idle very consistently. Since the timing was advance from the previous owner, I tried advancing the timing and voila. It runs perfect; strong, consistent acceleration and steady, reliable idle. It will hold 65-70mph now and has some power in 5th gear. I'll probably re-check the compression again once the rings are fully broken-in. I dumped the oil after 50 miles and the website was right, there was a lot of metal shavings in the oil. I plan to change the oil again after the 250 mile mark. I hope someone may find this helpful. If anyone is diving into this themselves, feel free to email me or comment and I'll try to help you out.


Electrical Wiring and New Handlebars
I bought new Euro style flat bars. In order to swap bars, you need to dig into the wiring a bit. I figured the best way to do this was to unhook all of the wires coming from the handlebar controls in the headlight bucket. Taking note of any weird connections. Then with patience, a hanger and wd-40 I slid the wires out of the old bars and into the new ones. Be careful with removing the right hand controller. There's a little gauge wire connected to the starter button. I accidentally pulled it off and had to re-solder it back on. In the headlight bucket, I had one brown wire connected to nothing. Not sure why, but everything seems to work fine without it. I cut about an inch off of each side of the bars to better fit the bike.


The Gas Tank and Gasket prep
The tank had some minor surface rust, so I decided to KREEM it. It's expensive, messy and annoying, but it works. NOTE: Make sure to not cover the vent that's on the lid. It's the little triangle shaped bump. If this gets clogged, the gas won't flow and you'll be stranded on the side of the road. Yes, I learned that the hard way. I used copper spray a gasket on all of the new gaskets. I'm still not sure if it was good to use it on the side crankcase covers, but it was recommended by many people online.


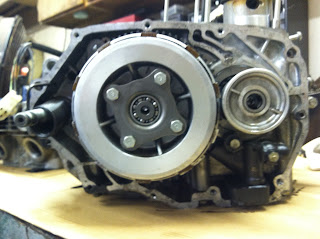
The Clutch and Crankcase
My clutch would slip 1 out of 30 times. So it wasn't a real issue but I figured I should examine it anyway. The clutch plates and all mechanisms seemed to be in proper order. No uneven wear spots or discoloring. The oil filter was seriously dirty. There's no screen mesh or anything just a little bucket that spins the debris onto the sides. No dirt just tons of metal shavings from the cam chain grinding into the cylinder. So I thoroughly cleaned that out. To split the crankcase, I flipped the engine over and balanced it using two tool boxes. This keeps everything in the case when you split it open. I found some more metal shavings that had settled in the bottom of the case. Besides that I didn't mess with anything else. The biggest thing to note is to make sure the kickstarter is in it's groove. Also, If you move the main crank at all, make sure the main crank is lined up with each tick mark, and it's locked into place. There's one tick on each of the 4 things(?) that hold the main crank in place. You can independently spin each one until they fall into place.


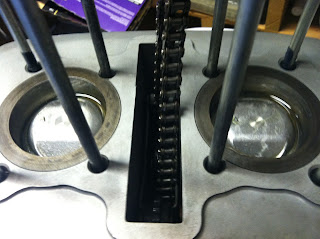
The Pistons and Cylinders
Take note where all of the guide pins are (pic3). The head broke loose from the cylinders really easily. At this point there were lots of things to notice. Valve seats; corrosion, wobbliness, color. Cam chain adjuster was locked, frozen into the head, so the chain was slack and scraped off a track into the metal. The cylinder was much harder to break free from the lower crankcase. More patience and gentle knocks with a rubber hammer and a piece of wood to spread the impact onto several cooling fins, instead of just striking the cooling fins and risk cracking them off. The cylinder walls were in pretty good shape, but a little glazed. You can still see a hint of the crosshatch, so that's good. The pistons were in pretty good shape too, some minor skirt wear and carbon deposits on and around the head. Rings were in pretty good shape, but when I removed one to check the end gap, it snapped on me. So I removed them all and the gap was within clearance specs. When removing pistons, take care to not drop the clips that hold the piston pin in. With all of this in mind, it seemed that the valves were most likely causing the majority of compression loss. I had a reading of 95 in one and 110 in the other. It's supposed to be at least 150 psi. So I took the head/valves to get a machinist to properly grind a bit so the valves seat correctly. He said my valve guides were ok (causing the wobbliness) so i left those alone. The machinist also honed my cylinders and drilled out the cam chain tensioner bolt that was seized up in the front of the cylinder. I guess this bolt was a design flaw in these 70's honda twins. Once drilled out, I found a new bolt and made sure to put on some anti-seize. And since I broke one of the rings, I replaced them, the pistons, pins and clips. Finding the std size rings was a huge issue, it took me about 3 months to find them. I ended up finding them on ebay from Israel.


Subscribe to:
Posts (Atom)